Showing posts with label tutorials. Show all posts

Tuesday, March 30

*t-shirt dress tutorial

Recently I have had the opportunity to make a few t-shirt dresses for a sweet little girl who lives in a world of boys! (She has four brothers)  Believe it or not.. my dear mother in love made t-shirt dresses for me, oh I don't know.. maybe twenty or so years ago. The ones she made for me fell more at the hips while this one falls right above the waistline.

I found the t-shirts at a second hand store for less than two dollars each. The fabric is from my quilting stash, but fun and funky! The great thing about this project is you can use t-shirts that may have stains down on the lower part, because you will be cutting that off.  A new out fit can virtually be made by using what you already have in your home.  Save dresses that you as a mother no longer want, this fabric can be used to make a t-shirt dress for your little girl!
Cut off the length that is to your liking. Make sure you get a clean straight cut.
 Then you need to run a loose basting stitch in the fabric which you will use for the skirt part of the outfit. Then you will gather the fabric.  Check out step by step instructions HERE.   I used a half yard of fabric. I would have liked it to have been more gathered, but this polo top though made of t-shirt type fabric was a bit stretchy for my optimal desired results.   

You can go ahead and hem the bottom of the fabric.
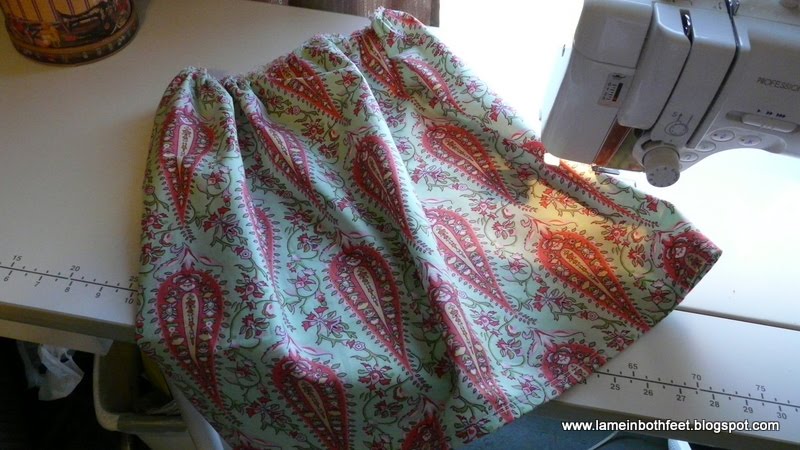
Next you will put the shirt part inside the skirt part.  The right sides of fabric need to be together with the wrong side of the skirt on the outside.  Then you will have to fit the two together and pin them in.  Some area may not fit perfectly, but you will just pin it, and sew which will make little gathered areas.

When I was done sewing a straight stitch all the way around, I went back and sewed with a zig zag stitch to stop any fraying. 
Ta-da! Isn't it cute!  I also made a little elastic belt should she want to use a belt, if not she could use it as a head band perhaps.  I will be making a few others and will post pics of those as well!  

This was not my own novel idea. As I said, my m-i-l made these for me years ago, when I was young and cute. So now I am minded in such a way that I don't want to get rid of any piece of clothing that could be re-purposed as a little dress for a young girl, or a skirt perhaps!  I did a google search on free patterns and found directions for making a pillow case sun dress. 
Check out the sweet 100% cotton pillow case that I found for one dollar. I bought it with the pillow case dress in mind! 


Tuesday, September 1

*empty altoid tin repurposed into a mini-scrapbook


My dear husband loves Altoids and for a little while he was going through them like 'candy', um they are candy aren't they? At any rate, he would rather save the tins and find a use for them instead of throwing them out. As the tins started to accumulate I felt it necessary to either find a creative use for them or throw them out. This is what I came up with, a mini-memory book in a mint tin. I love making these because I can use duplicate pictures that I may have to avoid waste in that area too! These have been given as gifts to dear friends and family members. What a wonderful momenta to a family trip, vacation, girl time, or whatever the occasion.

While visiting my mother this past summer, I was able to scan a bunch of our old family pictures in which I ordered prints. I used a number of these old pictures to create a mini-memory book for my father. I know he holds this near to his heart with pictures of good times with his mother, sisters and brother as well as us kids growing up.

These are the supplies you will need to gather:
  • empty Altoids tin
  • 20 peices of card stock cut to 2 inches by 3 and half inches (color preference yours)
  • corner rounder to round the corners of the card stock if you choose
  • double stick tape
  • 1/2 inch ribbon or wider; or strips of fabric of your choice
  • scissors
  • paper cutter
  • scrap booking stickers
  • photos of course
  • and a charm of some sort to tie to the end of the fold out (even a large metal button would work)


Lets get started!

Tuesday, July 28

it's a wrap, fabric wrapped clothesline baskets, coasters, hot pads and more!


Fabric wrapped clothesline baskets- what fun! I found a couple of tutorials online when I first started making these baskets. I did not learn from purchasing the book, "It's a Wrap." In fact, I later purchased the book and found it to be a disappointment because I did not learn any new techniques outside of what I had already learned by experimentation. I have created a number of unique baskets, simply by trial and error. I have made large, small, round, oval, skinny, narrow and wide baskets to fit many different purposes and some of which are decorative with little functionality.

I have found the cotton clothesline at Walmart, Lowes and Home Depot. I know the craft stores carry this as well, but figured the prices would be higher since it would be sold as a 'craft item'. Several of my created baskets were made from left over strips or scrap material, but most were color matched to a quilt or the liking of the recipient.

If my tutorial is not clear or you have questions, please let me know. If you would like to see more of my finished baskets please leave me a comment, and I will be glad to post a link for all to see. You can do this! Have fun and share some of pics of your creations with me.